Hi again,
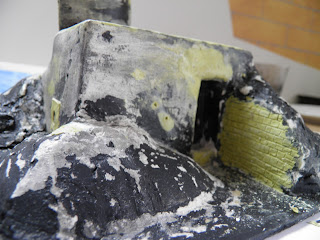
the work continues on the bunker (and a wish to make it in a smaller scale instead!).
The list of things done is rather extensive, counting the fact I barely touched it in the past two weeks.
First, I had to peel the paint off, as mentioned in the last post.
Except for being rather messy, it actually gave the bunker a nice worn out look!
Next, I decided it needs the cuts in the roof to help keep water off it, and to give grass something to root into for camouflage (can't be seen on photos). I also started filling some holes with milliput and then I started working on the firing embrasures (a plate with three holes for the cloche, plus a single flank mounted machine-gun).
I also started preparing holes for ventilation, periscope and a grenade chute. Lastly, I sculpted a horrible stone wall that holds the mound of earth vertical at the entrance. I think I will redo it, but I would have to figure out how to make it look a bit more realistic.
What else can be seen is the fact that the turret in particular is very crooked, which is driving me mad. As usual, the lesson learned is that more time and attention should be invested in planning!
That's it for today!
Thanks for looking,
Mathyoo


Congratulations, Mathyoo, on learning the most important lesson of model making - take your time in planning. It pays dividends! If you are not happy with it, and I can tell you aren't, then move on, learn from your mistakes and start again.
ReplyDeleteThanks Bryan!
DeleteIt is not really THAT bad, but as it usually goes, all I notice are the negative aspects, which I want to talk about so I can avoid them next time.
I am quite determined to make more of smaller ones next time, so I can make a landscape, but this is as good a chance as any to solve the unforseen problems!
Great start looking forward to see it finished
ReplyDeleteThanks - I hope I can deliver!
DeleteLooks good to me- I'd be happy with it.
ReplyDeleteCheers,
Pete.
Thanks Pete, but that's just photography! :P
DeleteKeep going. While it is not there yet I know it will all come together and look good in the end.
ReplyDeleteThanks Clint! It does look a lot better than it did when I started, to be honest!
DeleteStill looking pretty good to me.
ReplyDeleteThanks!
DeleteDespitethe turret's crokedness, I'd stick to this build and think of it as a test piece.
ReplyDeleteYes, I had the same idea - there's so many other things that will go wrong it's best to see this one through and avoid all the pitfalls with a new project later on.
DeleteProgress is progress. We all make mistakes from time to time. Like on my large ruin I assembled it all then couldn't access bits to paint....... I am sure you over come these problems with this build and take forward the knowledge for the next one.
ReplyDeleteWell said, thanks!
Delete