30 Jul 2014

Back home again

Hello guys,

I came back from my trip to Geordieland yesterday. I had a great time with Zabadak Joe and Zomfan Bryan up north. The three of us even managed to play a couple of ATZ games for Joe's campaign. He will be posting the reports, so all I am going to say is I really enjoyed it and could clearly see why ATZ rules are as popular as they are.

I am a huge fan of Joe terrain. Each of the models is a tiny masterpiece in itself and full of all the tiny details I would never think of. Below is just a quick shot at Alldie store. The name still cracks me up.
 Joe made sure to keep me occupied and took me (and Bryan when he felt like it!) to all the cool places. Below is a Tynemouth castle sitting on a cliff above the beach. As an interesting fact, this castle had (has?) huge 9.2 inch guns emplacements  to protect the area from an attack during WW2.
 We went up north to as far as Bamburgh (medieval Northumbrian capital) and even spotted a WW2 pillbox on the sand dunes. It looks dead boring on a photo below, but it had to be seen from up close!
 After Joe and I climbed there, I spotted a dug machine gun bunker just below the open one you can see above. I crawled in to take some photos and a confined space can clearly be seen. What can't be seen is all sorts of vegetation that got stuck on my pants and shirt while I was climbing back out again!
 A pair of shots of Bamburgh castle down below. It is huge.
 

One of the other things worth mentioning is the infamous (at least from the Geordie perspective) Sunderland. I was there for perhaps a couple of hours all together. On a photo below is a Wear bridge. It looks just like Newcastle's Tyne bridge. Except smaller. And southern!
I have to be careful with my words now, but from what I saw Sunderland is a lot like Newcastle.
 To be perfectly honest, Sunderland at the time I was there had something Newcastle did not. An airshow. While waiting for my train, I managed to see a part of the Red Arrows show! Not an huge airplane fan myself, but they were quite spectacular.

All together, I only spent a day in London on my way home. I decided to spend my time visiting newly reopened Imperial War museum. They had a fantastic WW1 exhibition and a lot of new stuff that weren't on display when I was there in 2012. Unfortunately, many vehicles were missing, including the Matilda 2 tank. Among the harrier, V2 missile, Spitifre and the likes, there was this Reutres landi that really popped out from the crowd. It was used by a news crew that was hit by an Israeli rocket in Gaza. Both journalist survived the hit, but were badly injured. One of them died just few weeks later when his vehicle was hit by a tank he was filming.

As far as the hobby front goes, I managed to bring home a decent loot to further progress with my moderns project. Moderns seems to be my thing in 2014 and I can proudly say my motivation is still running high.

Starting with a cherry here, but below is a quick shot of Empress modern US infantry. There are 4 fire teams on the photo. I got another fire team worth already, plus an MG team, EOD team and a pair of downed pilots I was talking about in previous posts.

In other words, this gives me a small platoon HQ and two sections (9 members) with 2 teams each. An up to date Slovenian platoon would have three sections and three FN MAG teams (I got one of those), plus a team of snipers. Given I would never really need to play with a whole platoon, I think I got the basic troops covered now.

Rifles have been posted to Rovanite of Grekwood miniatures, so conversions of those troops will have to wait. I have my FN minimi SAWs, however, so I will start with converting the support gunners first. Empress US miniatures are armed with M249s, which is basically the same weapon, but with different stock and a barrel overheating guard.
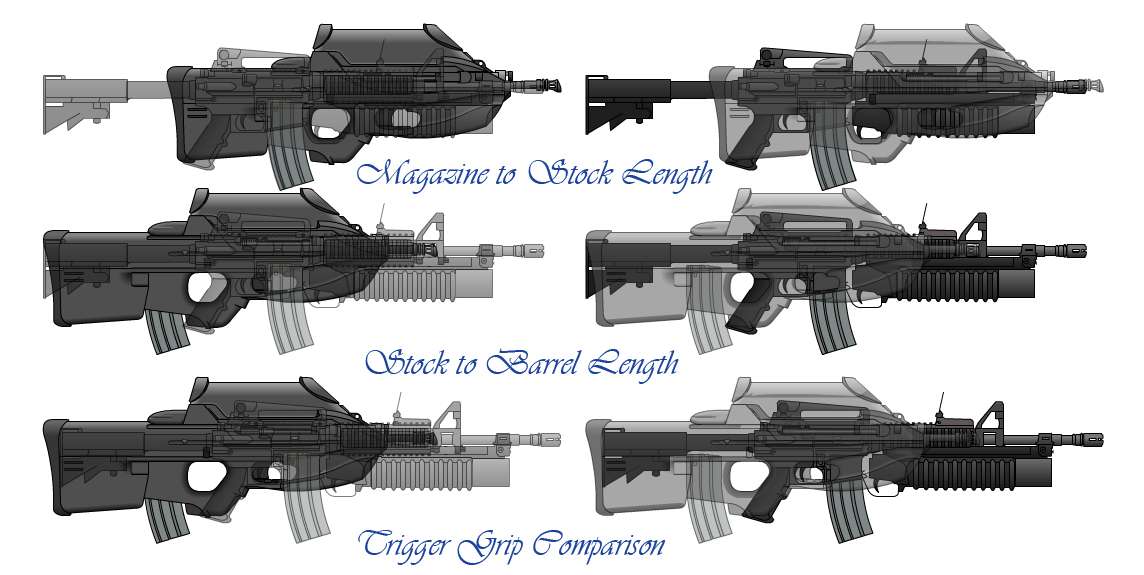
You can see on the photo below that they are quite compatible size wise. I prefer mine (based on Ebob's work, so not REALLY mine) as far as the size goes, as they are a bit narrower. I am not at all satisfied with my stocks, however, so there is a chance I will be rebuilding it for most of the miniatures I will be converting.

Waiting for the rifles doesn't mean I have nothing to do, however, as I would want to finish converting my civilians I started working on a while ago. I really like the feel they bring to the games and as my moderns will be a low intensity conflict, I would want to have them around my board to give my games some depth so to say.

I also brought home some books. From those shown, two are on modern subject and should be a valuable source of scenarios ideas. One was bought at Poundland (Task force Helmand,  a fantastic book judging by a prelude chapter) and the other one, Bomb hunters at a Tynemouth market. I got them for a standard value of 1 GBP. I might mention the one from Poundland was originally printed in 2009 and has a price tag of 17 or 18 quid, so it REALLY is cheap.
The third book is on WW1 and it's not really wargaming related (for now!)

While Joe and I were at the Tynemouth market, we also spotted some military vehicles. Starting at one, I later bought 4 Unimog trucks and a Deagostini GAZ jeep. I did some research and VAI written on its sides apparently means military police. It is held together by a tape because it started falling apart while I was looking at it :D. I am especially happy with the four Unimogs as they are a great way to build up a military convoy.

As soon as the weather here gets better, I will undercoat them all and go for a repaint. I am not sure about keeping the lights on the Unimogs. Painted orange, they would have their use.


This is it for today and I will hopefully have something done by the end of the week!

Thanks for looking,
Mathyoo

16 Jul 2014

Evergreen armed forces fire team

Hello guys,

It took me a bit longer than expected, but I have finally finished painting a fire team, belonging to Evergreen armed forces (or whichever other, for that matter).

They are based on Warlord games USMC, which are nice miniatures by themselves, but very "heroic". As I am mostly dealing with WGF and Studio miniatures plastics, I must say I was a bit surprised by their size (which, I suppose, is a good thing).

I was showing WIP photos before, but in general, they got weapon swaps and had body armour sculpted, the rest is straight from the box.


As you can see on the photo above, the fire team is pretty basic. There are two riflemen, a grenadier and a LMG support gunner. I decided to give them those Yugoslav lizard pattern uniforms, complimented by donated US woodland vests and helmet covers. They are armed with old surplus weaponry. This "poor" look to them doesn't really fit my idea of Evergreen Fields being a flourishing tourist resort (as it is in my idea of a zombie campaign), but it fits a coup d'etat better.

I might let you know I photographed them 3-4 times, but the photos always came out weird. Those are best I could come up with.

Below are a "leader" rifleman and a grenadier.  Not much to add, they are both armed with M16s, while grenadier guys carries a horrible conversion of M79. Underslung GLs are fine and all, but I particularly wanted a separate one for those guys. I would prefer a more modern version, but this one was much easy to make.

Different camouflage pattern is particularly visible on the back photos. As usual, they are very glossy, but I am honestly using a mat varnish to seal the paintjobs.
Below are a rifleman and a "SAW" gunner. Rifleman is armed with an M16, as usual, and support gunner has one of the million modernised versions of inglorious MG42.

Not much else to add, I might mention I went full lazy on those and I didn't even bother covering the gaiters, I just painted them black and called it a day.


Buying those was more or less an impulsive buy (sprues were 50% off) and they will be used with my other modern forces as a lesser quality local troops. So, basically for variation.
I could do better job at converting (just look at MG42 guy's left shoulder joint) and especially at painting, the two camouflages should be strikingly different, but it didn't exactly caem out as expected. Other than that, they are more than suitable for what they are.

In other news, I am going on vacation for the next fortnight. I am going to visit my two favorite Georides, and I might meet Vampifan and Zabadak while I am at it, as well :D.
My converted versions of  F2000S' have been sent for casting and I have more Empress miniatures waiting for me, so I will have a lot of work to keep me busy through the August.

As  usual,

thanks for looking!

Mathyoo

9 Jul 2014

Crew members

 Hello guys,

To keep the momentum going, I started converting my Empress miniatures to Slovenes as soon as I got the guns. While I am using US infantry as the basis for my conversions of the gurnts, I decided to use British downed pilots for my test piece first. 
I primarily bought this pack for a size reference to help my sculpts fit them size wise, but there is no reason for them not to be "conscripted" in the SAF ranks.
I still haven't decided just what exactly to do with them.
The guy on the left had his carbine substituted for an F2000S rifle and the other one will not see any changes to his weaponry because having one with a pistol seems like a pleasant change. I was thinking about adding him an (empty) rifle, but that would just make him look cluttered as he carries some pouches and a bag as it is.

Here is my patient zero before the surgery.

The thing is we don't have assault helicopters and I am not sure if I would want them to be pilots. Pilots are great for Search and Rescue missions and so on, but I don't think I ever saw our pilots with a combat vest and armed.
Second role I could use them for is as an APC crew members. Those would work much better and I could sculpt helmets on them for a bit of a diversity.
This is generally a no brainer, but the thing is, I could paint the pilots in one colour OD overalls, which would be a nice contrast to the infantry, while APC crew would have to be painted in camouflage uniform as they are part of the infantry, after all.
Brainstorming like this, I suppose I could go away with one colour overalls and still sculpt the crew helmets on them (for the sake of converting the guy with a pistol) and simply call them "tank crew".
While I think I am far from being a rivet counter, certain details bother me so much, I can't just skip them. I have way too much time on my hands!

To prevent yawns from my ideas, here is a step by step of the "surgery". I decided to write this up to show you there is no science behind simple conversions as this one and to help me keep track of what I changed (this will be more important later on, when I will be working on the basic fire teams)

after the mandatory pre-surgery washing, I took a knife and cut our brave man's palms right off. I had some problems cutting around the magazine and stock of a carbine and I couldn't leave it undamaged. I decided to keep the hands for future reference. There was an option of leaving his right hand on the body and "simply" cut the gun "to fit", but I decided not to do it this time.
 Being handless, our guy needed new hands. After I saw Ebob's conversion of Empress US, I noticed his wire for hands was smashed into a "spoon" at the fingers area, which makes perfect sense. I grabbed a wire and started hammering it. I had then had to cut the flatten area to a smaller size and yet it proved too wide. They are so tiny!
 Next, I picked up a rifle and started chopping it to make it sit better on the miniature. At this point, I also decided right hand wire support was not needed as I drilled a hole too close to the body (lesson learned) - so the wire interfered with the placement of a rifle.

I decided this was not a problem and started sculpting hands full of confidence. The lack of armature on the right hand proved problematic, of course. You can (hopefully) see on the photos below that I only managed to sculpt one finger on his right hand. Adding some putty for the rest 3 (not counting thumb) is much easier than trying to sculpt all 4 now with putty swinging around like a monkey on branches. I tried to make it look obvious his index finger is stretched and does not rest on the trigger. It's probably not obvious, but hey - safety first.
Left hand got all fingers done but a thumb (that would be added when it all cures so I don't mess up what I've done so far). I found out that wire support was a tiny tad too broad, so I shifted the grip a little forward (it's not noticable, really). I was (yes, was...keep reading) really happy with how the left hand fingers came out. Fantastic, nicely rounded individual fingers, all more or less of the same size.
You can see thumb missing on left hand.
..BUT! After looking at it for too long, I decided his pinky finger is a tiny tad too large. I suppose nobody would notice, but as it was early in the morning and I wasn't thinking straight, I went to cut it shorter. Then my cheap glue (lesson learned -.-) let go under the pressure of a blunt knife (I used a fresh blade on everything, but this single pinky!) broke the 4 fingers. Not to mention the knife doesn't cut fingers in a natural round matter and the finger was ruined and with it the whole hand either way. So I cut it all off. At this point I might mention that for my first try, the hands were sculpted using a mix of green stuff and milliput - perhaps with a 3:1 ratio (I did it totally by the eye). It means it was still very elastic, but it had a tiny bit of rigidity to it, which allowed for lovely rounded shape that I would have trouble getting with green stuff alone.

After I gave it another try, I used a bit harder Greenstuff instead of mixing milliput in as well. The end result is visible below. I am quite happy with how it turned out, but it's not as good as it was.
Right hand's fingers are horrible because there was not much place to sculpt them (the GS layer is shallow) - I would probably have to file the gun's handle just a bit to be able to sculpt a more natural grip. If I would simply thicken the GS layer, I would end up with his index (done in first run) finger way too thin and it would look odd.
So - that's him finished for now while I ponder the idea of adding helmets to them both or at least the one with a pistol. Any thoughts on that?

Also in today's news, I have finished sculpting a grenade launcher on my F2000 yesterday. You can see it down below (top new, bottom old). It's much smaller with a lot softer detail. I am not too happy with how it came out but I had to shape it all in one go so if I moved putty to point A point B got all messed up.

It is way tinier than what you'd see on other rifles, but I think it fits the size of this gun. The actual launcher has a very small overlap over the gun (like what...less than centimeter on each side?), so anything larger would be wrong. It looks awfully small, even compared to Ebob's M16 and his guns are quite realistically proportioned. Unfortunately I have no Empress miniatures with grenade launchers to compare the size just yet. I think I will just thicken the barrel some more (light green) and it should be just fine.

I will now start cutting up the rest, but they won't be armed until those new versions of the guns get cast, so probably some time in August.

Thanks for looking,
Mathyoo

4 Jul 2014

Working on the guns

Hello guys,

Before I start with the main topic of today's post, I would like to thank each and everyone of you who have helped this blog get 50,000 hits. I am trying to make my posts interesting and at least somewhat hobby related even when I don't have much to show you. Your comments are always appreciated as they are an inspiration and a push force for my projects. Thank you!

This Tuesday, a long anticipated mail finally arrived all the way from the remote Scottish highlands!

Mail was from one Hunterpest, an owner and a man behind Project Zeke miniatures (alternatively, click the banner on the left ->).
You should also check his blog, HERE. He very kindly agreed to put my F2000S and minimi (based on AUG and minimi made by and with permission from E-bob) in his mould  while he was casting his own miniatures.

I got to say they look much better in person. I am really happy with the rifles, but they should be a tiny tad higher up front I think. My work on the minimi is limited to a modified ammo pouch, optics and horrible stock.

I will use these "version 1" rifle as a basis for (you guessed it!) "version 2" variants. Those will include the three basic versions used by Slovenian Armed Forces: standard with red dot, standard with UGL and one with magnifying optics.

Below are the greens. In process of mould making, the temperatures and pressures are high, so they come out burnt. This is why plasticard doesn't work with metal castings, unless you'd cast them in resin first. As you can see the gun surivived the trial, but minimi's stock broke (like countless times before I even gave up and called it finished). I have to admit I am disappointed in myself for not persisting as every little mistake is noticeable on the casts.
 I grabbed one of the Empress M4's for a size comparison. Judging by THIS photo, the length seems fine, even if F2000S seems really tiny. It could use a liiiiittle more height, but certainly not over 0.25-0.5 mm, which is just too little to bother.

 I am pretty sure I mentioned this before, but the difference between the standard FN F2000 (the one you see in computer games) and Slovene FN F2000S(lovenia) is in the rail for optics. Original gun has (when you take that oversized box off)  a plastic rail that is fitted straight on the gun, while "our" version has a steel rail that is a bit rised, to allow space for a carrying handle. I have "intended"  this handle on my sculpts, but it is so tiny it's barely noticeable. There are also some inside differences, but those don't really apply to our hobby.

F2000 "tactical" - the purely standard version has mechanical sights on top of the optics housing.


F2000S with an aimpoint red dot - the one with UGL is the same.
F2000S with trijicon "sharpshooter" optics - one per squad.
First thing I did was clean the sculpts in warm soapy water as I mentally prepared for the surgery. Then I cleaned any traces of mould lines and "sprue" on the weapons. I also cut the left over wire, which was left there intentionally so the thing wouldn't break up for the millionth time. While doing all this, I was trying to figure out what bothers me with the general shape of the gun. And I know. It has a tad too low profile. We're talking about less than half a millimeter, but it's there and I am trying not to be bothered by such a minor thing.
I also filled and tried to thin the flash guard a bit...I can't really reproduce the shape of the original, but it doesn't have to that thick, either.

You can see the tiny wire on the back of the optics in this photo. This was made to be cut away.
I found an aimpoint armed US soldier in my EOD disposal team pack from Empress, so I had an idea of what I'd like to make:
 I used the premade "optics buldge" and wrapped some GS around it. At one point I stuck a piece of wire half way in to get that tiny tube where batteries are stored. I also pushed some putty around to make sure the front half of the optics was a bit thicker than the rest. It didn't came out as nice as the Empress one, but I think it gives away the intention.
Trijicon was a bit more complex. The one you see below got scraped and I gave it another try.
 Here you can see the second try. It's not the best representative, but the identifying feature of the optics is it's conical shape and not the adjustment buttons. It's hard to find the balance between the realistic details and an interesting model and it's something I'd need much more practice to find the balance at.

 I made a Trijicon version and three red dot versions. One will be as it is, one will get a grenade launcher attached and the third is for my test miniature I am working on (more on that at a later date!). To avoid sculpting 20 optics, the bulk of my forces will be converted once I get those "updated" versions cast.

It has dawned to me I probably talked more than it was necessary in this post again, so I apologise for another lengthy post, but at least I have included lots of photos!

For a conclusion of today's post, I figured I would show you a size comparison photo. Below is an F2000S, British Sa80 (some 10 cm longer than F2000 IRL), M16 (around 30 cm longer IRL), Ultima ratio commando sniper rifle  I am making (as usual, I hit a brick wall at the scope) and lastly a RGW90 disposable anti tank weapon. This one was finished before but I cut some of it off as it was too long. It should be as long as M16 IRL, so as you can see, I messed it up  a bit.
 And a shot of first try sniper rifle (lower one) and the new one. I am pretty certain starting over was a good idea as that rifle was just too tiny.

I also apologise for shameless advertisement, but I think this is the least I can do for the great guys of afore mentioned sculptors. This project would never come to a stage it is now if it weren't for their help.

Thanks for looking,
Mathyoo